Building a solar generator
Guest Post by Bill Brooks
As many of you know, I recently completed my tiny house on a trailer. I plan to travel to a few locations beginning this winter. I built my tiny house to be self contained, since most of my time will be spent in places without services (electricity, water, etc.). Since batteries will supply the house’s electrical power, I will need to recharge them often. While I will have a propane generator, I plan to use solar power for most of my needs. This should allow me to get power, and keep the costs down by not buying propane as often as if I was using the generator.

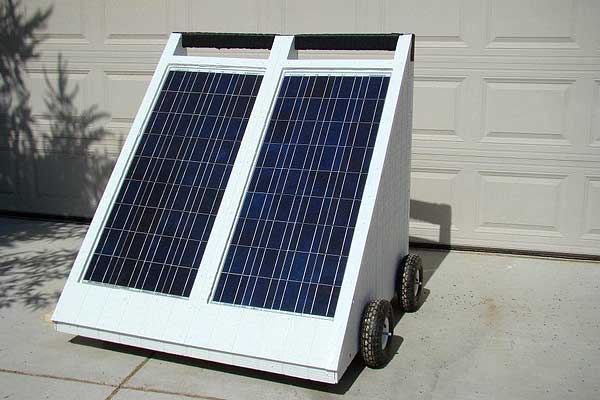
Completed Solar Cart
Often, trailers have the solar panels mounted on the roofs. This allows the panels to charge the batteries as long as there is sunlight available. The problem with this set up is you need to park your trailer in the sunlight. While this might work well in some locations, others will have trees and other obstacles that can block the sunlight. Also, certain locations might result in parking the trailer facing away from the sun, hence lowering the output of the solar panels.
Originally, I decided to place the solar panels on a cart. This would allow me to move the panels into the sun, reposition them as needed, and provide storage for the panels. As a further enhancement, I added a solar controller, battery, and inverter to the cart and turned it into a solar generator. That way I could have power available in almost any location I plan to go. With this set up, I can use both AC and DC items, such as a microwave, and even a refrigerator all powered by the sun.
The Solar Generator Parts
First, the technical details for those who are interested. The solar generator (which I call the SolGen 160) has a four major components. The 2 solar panels are rated at 80 watts each, for a total 160 watts. The solar charge controller is rated at 30 amps. The battery is a marine deep cycle model, and is rated at 210 amp hours. The inverter is provides a steady output up to 1100 watts of AC power, with a peak output of 2200 watts.
Ok, so what does all that mean. Based on the manufacture’s solar panel ratings under ideal conditions, the SolGen 160 should provide approximately 460 amps of power each week to charge a 12 volt battery. While you never want to discharge a battery completely, the output is enough to fully recharge the battery in 3 to 4 days. If you use only 25% of the battery each day, the solar generator should be able to fully charge it up during the next day. With this set up, it can power a number of appliances, such as a small microwave, TV, laptop, or even some power tools. All the comforts of home can be available wherever the cart is located, in a campground, a forest, or even the desert.
How was the cart assembled
I used 2×3 lumber as the framing for the cart, and enclosed it with the T-1 siding. The overall size of the cart is approximately 4 feet wide by 4 feet long by 4.5 feet tall. I began by building a wooden frame that fit around each panel. I then built two L-shaped pieces for each panel to hold the panels at a 45 degree angel. The L-frames were cross braced to provide a solid base for each panel. Then the two panels were attached together by screwing the frames together. Next I added the T-1 siding to enclose the cart, and a piece of plywood to form the cart floor. After that, I built doors on the back to allow access to the battery and components inside the cart. Finally, the cart was painted and caulked to prevent leaks, and wheels added to make it mobile.
Here is a video slideshow of the building process…(video created by Steven at Tiny House Listings)
Cost of Materials
The SolGen 160 cost approximately $1500 to build. The cost breakdown is as follows:
Solar Panels – $ 850
Battery+box – $ 180
Solar controller – $ 100
Power Inverter – $ 70
———-
Subtotal – $ 1200


No comments:
Post a Comment